Access Point Setup On Mikrotik Router: A Comprehensive Guide
Are you looking to set up your Mikrotik router as an access point? Look no further! In this article, we will guide you through the process of configuring your Mikrotik router as an access point, step by step. We will cover the basic configuration, bridge mode, wireless settings, and more.
Section 1: Basic Configuration
To start, you need to connect to your Mikrotik router using WinBox or WebFig. Make sure to use the MAC address of your router to connect via Ethernet cable. This is the recommended way to configure your router, as it will prevent any issues with IP address conflicts.
Section 2: Bridge Mode
To configure your Mikrotik router as an access point, you need to put it into bridge mode. To do this, navigate to the "Bridge" section and click on the "AP-bridge" mode. This will enable the bridge mode on your router.
Next, configure the bridge interface to use the IP address of the access point. You can do this by navigating to the "IP" section and setting the IP address of the bridge interface.
Section 3: Wireless Settings
Now that your router is in bridge mode, it's time to configure the wireless settings. Navigate to the "Wireless" section and set the wireless mode to "ap-bridge". This will enable the wireless access point functionality.
Next, configure the wireless interface to use the desired SSID, channel, and bandwidth. Make sure to set the security settings to WPA2-PSK (AES) for maximum security.
One of the most powerful features of Mikrotik routers is CAPsMAN. CAPsMAN allows you to centrally manage multiple wireless access points from a single location. To set up CAPsMAN, navigate to the "CAPsMAN" section and enable CAPsMAN mode.
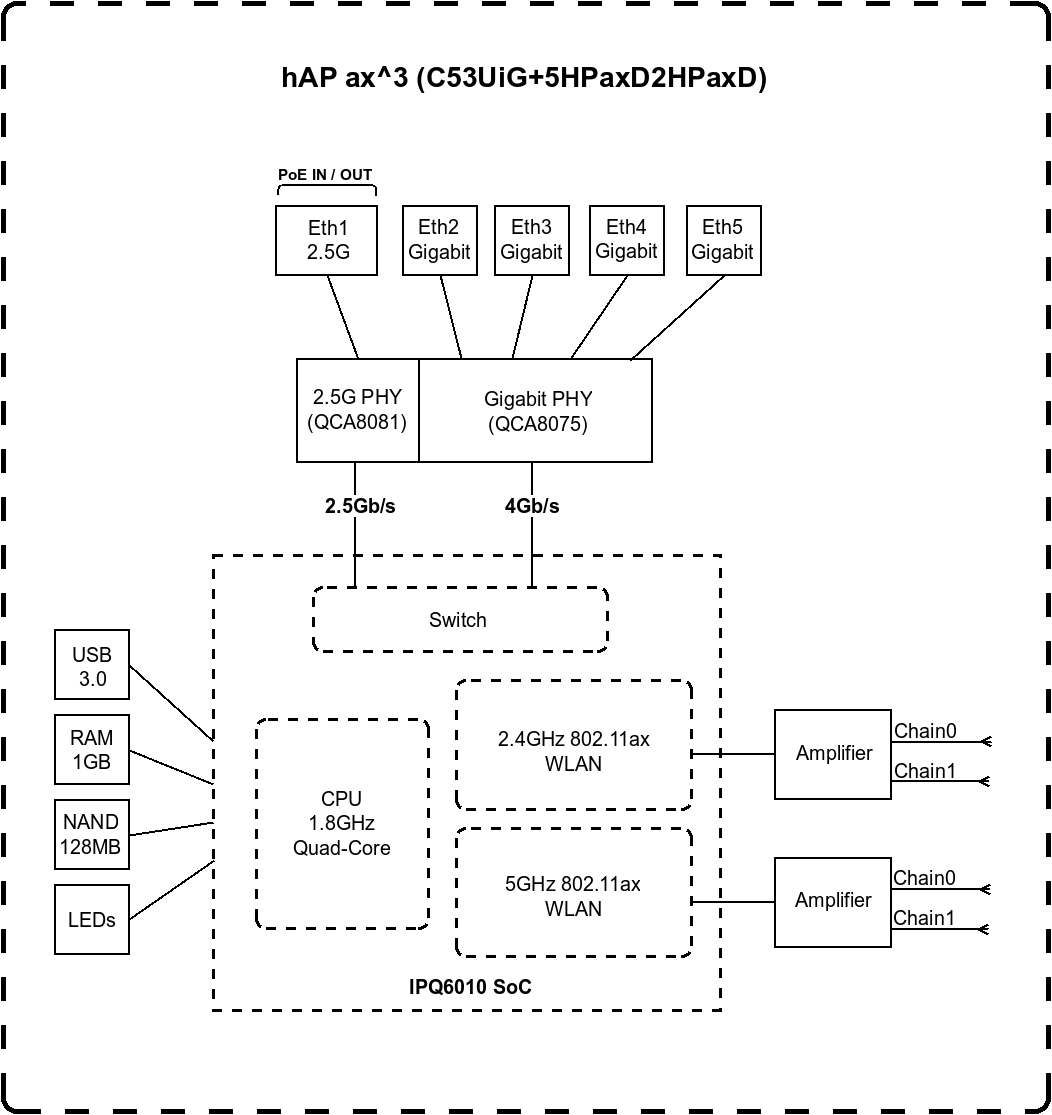
As we can see from the illustration, Access Point Setup On Mikrotik Router has many fascinating aspects to explore.
Next, configure the CAPsMAN interface to use the desired channel and bandwidth. Make sure to set the security settings to WPA2-PSK (AES) for maximum security.
Section 5: Datapath Setup
Finally, configure the datapath to use the CAPsMAN interface as the datapath interface. This will ensure that the access points are configured correctly and that the CAPsMAN interface is used as the datapath interface.
Conclusion
And that's it! With these steps, you have successfully configured your Mikrotik router as an access point. Remember to configure the wireless settings, bridge mode, and CAPsMAN settings according to your needs.
Remember to always follow best practices when configuring your router as an access point, and make sure to test the connection thoroughly before deploying it in a production environment.
Frequently Asked Questions
- Q: What is the difference between AP-bridge and bridge mode?
A: AP-bridge mode is used to configure the router as an access point, while bridge mode is used to connect multiple devices together.
- Q: How do I configure the CAPsMAN interface?
A: To configure the CAPsMAN interface, navigate to the "CAPsMAN" section and enable CAPsMAN mode. Configure the CAPsMAN interface to use the desired channel and bandwidth.
- Q: What is the recommended security setting for CAPsMAN?
A: The recommended security setting for CAPsMAN is WPA2-PSK (AES).


")
 on MikroTik Router")


 Triple Chain Access ...")


