Setup DNS Relay on Router: A Comprehensive Guide
What is DNS Relay?
Benefits of Setup DNS Relay on Router

Procedure for Setup DNS Relay on Router

Mar 1, 2025D-LINK DSL-2790U:RouterSetup, admin password, wifi, port forwarding, ChangeDNS, Backup and Restore Discover how to configure your D-LINK DSL-2790Uroutermodem with Mediaket's comprehensive tutorial. This step-by-step guide covers everything you need—from changing the admin password and setting up your Wi-Fi, to configuring port forwarding for game servers, updatingDNSsettings, and ...

Nov 3, 2025Ensure theroutercan reach theDNSserver. Ping theDNSserver from therouterwith its IP address, and make sure that the ip name-server command is used to configure the IP address of theDNSserver on therouter. Use these steps to ensure that therouterforwards the lookup requests: Define an access control list (ACL) that matches onDNS...

How do I configure QoS on myrouter, Read Answer How do I configure the time on myrouter? Read Answer How do I connect tworouterstogether? Read Answer How do I create schedule on myrouter? Read Answer How do I disableDNSrelay? Read Answer How do I enable DMZ on myrouter? Read Answer How do I enable Guest Zone/Guest Access on myrouter...

TodayWhat IsDNSFiltering and Why Does It Matter BestDNSfor Security: Ranked Comparison How toSetUp FilteredDNSonYour NetworkRouter-Level Configuration Device-Level Configuration Pi-hole vs AdGuard Home: Self-HostedDNSFiltering Testing YourDNSSecurity Configuration Frequently Asked Questions Does changingDNSslow down my internet ...

DNSsetuponWindows/Linux clients and Ciscorouters: ip name-server, ip domain-lookup,DNSrelay, DHCP Option 6, splitDNS, DoH/DoT, hosts file, cache flushing, and troubleshooting.

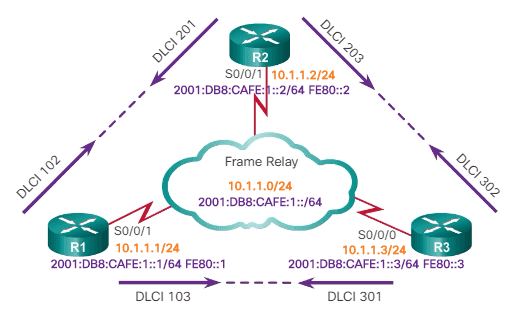
DNSRelayConfiguration OverviewDNSrelayis used to forwardDNSrequest and reply packets between theDNSclient andDNSserver. In the network whereDNSrelayis used, theDNSclient sendsDNSrequest packets to theDNSrelay. TheDNSrelayforwards request packets to theDNSserver and sends reply packets to theDNSclient, and domain resolution is realized. Configuration Topology Figure ...

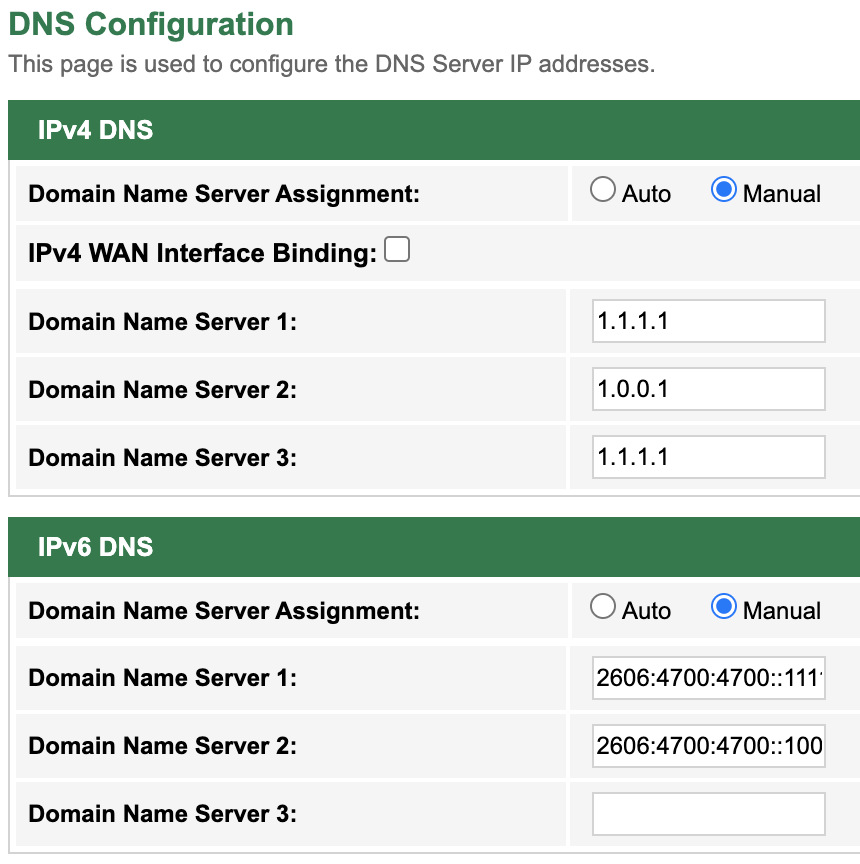
Domain Name System (DNS) is an internet service that translates domain names into IP addresses. This article will help you configure theDNSSettings of your network.
The Dynamic Host Configuration Protocol (DHCP) is a network management protocol used on Internet Protocol (IP) networks for automatically assigning IP addresses and other communication parameters to devices connected to the network using a client-server architecture. [1]: Introduction The technology eliminates the need for individually configuring network devices manually, and consists of ...

Procedure Run system-view The system view is displayed. Rundnsproxy enable ordnsrelayenableDNSproxy orrelayis enabled. Choose either of the following methods to configure domain name resolution. Configure static domain name resolution. Run ip host host-name ip-address A staticDNSentry is configured. By default, no staticDNSentry is configured. You can manually configure the ...

Huawei Technical Support
 - GeeksforGeeks")
Feb 10, 2026DHCP Server: The device (router/server) that manages the DHCP service, keeps the IP pool, and assigns IP addresses + configuration to clients. DHCPRelay: Arouter/switch feature that forwards DHCP requests and replies between clients and the server when they are in different networks (different subnets).

Hi, I am using OpenDNS. I have the OpenDNS servers set as Primary and SecondaryDNSservers inSetup> Manual Internet ConnectionSetup> PPPoE Internet Connection Type. This works fine and all the computers on my network are using OpenDNS as they should. However, with thissetupshould I haveDNS-Relayenabled or not?

In this article Important NotesRouterDHCP Server Firewall Active Directory Multi-Site Environments After successfully testingDNSForwarding on a single device, use this article to update your network configuration to point all outboundDNStraffic to DNSFilter servers. There are different network options available to forwardDNStraffic. This article addresses some of the most common ...
You can configure the Engine properties, activate optional features, and configure advanced Engine settings.DNSRelayDNSrelayallows the firewall to provideDNSservices for clients in internal networks. Getting started withDNSrelayInDNSrelay, clients sendDNSrequests to aDNSresolver, which forwards the requests to a remoteDNSserver.

What isDNSRelay? WhenDNSRelayis enabled on yourrouter, clients on your network that receive the IP settings from therouter(DHCP) will use therouterforDNSresolution (e.g. 192.168..1). Therouterwill assign its LAN IP address to the client as aDNSserver.

ScoutDNS supports aRelayconfiguration, allowing operators to install a lightweight service within their network. Therelayacts as a local forwarding resolver, processing internal queries while forwarding public queries to the ScoutDNS cloud resolver. Queries intended for internal services remain inside the network. Thissetupenables the following ScoutDNS resolver functionalities:
This article outlines how to deploy aDNSRelayusing binary with an in-app generated configuration or manual configuration. This article also includes links to deployment instructions forRelayImages and Docker. The DNSFilterRelayprovides organizations greater visibility ofDNStraffic on their network by performing split-horizonDNSresolution. The DNSFilterRelaydetermines if the ...

Oct 21, 2025RouterOS Documentation This webpage contains the official RouterOS user manual. RouterOS is the operating system of MikroTik devices. Documentation applies for the latest stable RouterOS version. Also available in the documentation in PDF format for offline use (updated monthly).

TheDNSproxy orrelayfunction enables aDNSclient on a LAN to connect to an externalDNSserver. After the externalDNSserver translates the domain name of theDNSclient to an IP address, theDNSclient can access the Internet.

Aug 29, 2025When aDNSproxy orrelayagent serves multipleDNSservers, the destinationDNSserver can be determined based on theDNSserver selection mode configured through thedns-server-select-algorithm command. Alternatively, aDNSserver can be specified as the destination for specificDNSrequests.

DNSRelaymeans in this case that all your machines send theirDNSqueries to therelay. Therelaysends the queries to theDNSserver of the provider or whatever is set in therouter'sWAN settings. When it receives the answer it sends it back to the machines and stores it for a short time.

After you configure the IP address of theDNSrelayagent on aDNSclient and that of theDNSserver on theDNSrelayagent, the client directly sendsDNSrequest packets to theDNSrelayagent, which then forwards them to theDNSserver.

Note: About this feature, it performsrelay/forwardDNSpackets only since D-Link DFL firewalls don't built-inDNSserver in system kernel. Therefore, it can not instead of realDNSserver to provide domain name resolving and related functionality.

Please assist with typical ADSL configuration. My ISP only sends outDNSinformation automatically (PPP) - no static entries. I need to capture this information andrelayit to users via DHCP. Currently when I do "ipconfig/ all" allDNSentries are empty.

I have spent a week playing around with a CCR1009 before finally today setting it up as my primary homerouter. I started by configuring in it's default 192.168.88./24 network below my normal home 192.168../24 network (AsusRouter). In that configurationDNS'just worked', and I didn't pay to much attention to how. Once I was happy it wassetup and working, I prepared to move it ...

Some D-linkroutershave an option underSetup/Network Settings called enableDNSrelay. Please make sure that this option is not enabled. The same goes fort unicasting if you have this feature. Also please un-link therouterfrom the myDlink service as this service will bypass andDNSsettings you make. Did this answer your question? Still ...

Oct 31, 2024When aDNSproxy orrelayagent serves multipleDNSservers, the destinationDNSserver can be determined based on theDNSserver selection mode configured through thedns-server-select-algorithm command. Alternatively, aDNSserver can be specified as the destination for specificDNSrequests.

setup a pihole Seriously, unless you can't restrict access to therouter'sDNSserver from the internet, there's no reason not to use it as arelay.

How to Make Verizon FiOS ActiontecRouterMI424-WR As Bridge Show Line Number in Xcode How to Escape Blank Lines (newline, Carriage Return) in Oracle SQLPLUS How to Rip Convert DVD Movies to IPad 2 for Free How to Choose Default Applications After the Installation in Ubuntu Linux All Time Popular

Jun 11, 2025Domain Name System (DNS) is essential for translating domain names into IP addresses, enabling network connectivity and resource access. This quickstart guides you through installing and configuring theDNSServer role on Windows Server. Learn how tosetupDNSzones, manage queries, and configure server options using PowerShell or Server Manager.